Chapter 15Project: A Platform Game
My initial fascination with computers, like that of many kids, originated with computer games. I was drawn into the tiny computer-simulated worlds that I could manipulate and in which stories (sort of) unfolded—more, I suppose, because of the way I could project my imagination into them than because of the possibilities they actually offered.
I wouldn’t wish a career in game programming on anyone. Much like the music industry, the discrepancy between the many eager young people wanting to work in it and the actual demand for such people creates a rather unhealthy environment. But writing games for fun is amusing.
This chapter will walk through the implementation of a simple platform game. Platform games (or “jump and run” games) are games that expect the player to move a figure through a world, which is often two-dimensional and viewed from the side, and do lots of jumping onto and over things.
The game
Our game will be roughly based on Dark Blue by Thomas Palef. I chose this game because it is both entertaining and minimalist, and because it can be built without too much code. It looks like this:
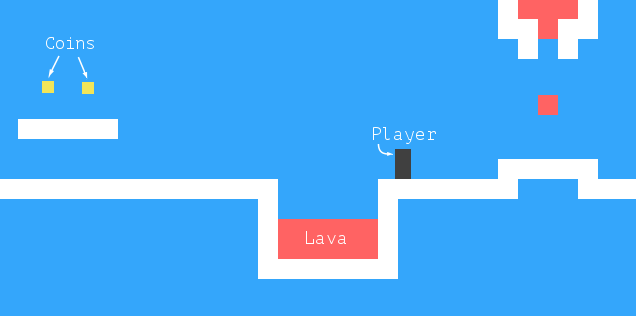
The dark box represents the player, whose task is to collect the yellow boxes (coins) while avoiding the red stuff (lava?). A level is completed when all coins have been collected.
The player can walk around with the left and right arrow keys and jump with the up arrow. Jumping is a specialty of this game character. It can reach several times its own height and is able to change direction in midair. This may not be entirely realistic, but it helps give the player the feeling of being in direct control of the onscreen avatar.
The game consists of a fixed background, laid out like a grid, with the moving elements overlaid on that background. Each field on the grid is either empty, solid, or lava. The moving elements are the player, coins, and certain pieces of lava. Unlike the artificial life simulation from Chapter 7, the positions of these elements are not constrained to the grid—their coordinates may be fractional, allowing smooth motion.
The technology
We will use the browser DOM to display the game, and we’ll read user input by handling key events.
The screen- and keyboard-related code is only a tiny part of the work we need to do to build this game. Since everything looks like colored boxes, drawing is uncomplicated: we create DOM elements and use styling to give them a background color, size, and position.
We can represent the background as a table since it is an unchanging grid of squares. The free-moving elements can be overlaid on top of that, using absolutely positioned elements.
In games and other programs that have to animate graphics and respond to user input without noticeable delay, efficiency is important. Although the DOM was not originally designed for high-performance graphics, it is actually better at this than you would expect. You saw some animations in Chapter 13. On a modern machine, a simple game like this performs well, even if we don’t think about optimization much.
In the next chapter, we will
explore another browser technology, the <canvas> tag, which
provides a more traditional way to draw graphics, working in terms of
shapes and pixels rather than DOM elements.
Levels
In Chapter 7 we used arrays of strings to describe a two-dimensional grid. We can do the same here. It will allow us to design levels without first building a level editor.
A simple level would look like this:
var simpleLevelPlan = [
  "                      ",
  "                      ",
  "  x              = x  ",
  "  x         o o    x  ",
  "  x @      xxxxx   x  ",
  "  xxxxx            x  ",
  "      x!!!!!!!!!!!!x  ",
  "      xxxxxxxxxxxxxx  ",
  "                      "
];
Both the fixed grid and the moving elements are included in the
plan. The x characters stand for walls, the space characters for empty
space, and the exclamation marks represent fixed, nonmoving lava tiles.
The @ defines the place where the player starts. Every o is a
coin, and the equal sign (=) stands for a block of lava
that moves back and forth horizontally. Note that the grid for
these positions will be set to contain empty space, and another data
structure is used to track the position of such moving elements.
We’ll support two other kinds of moving lava: the
pipe character (|) for vertically moving blobs, and v for
dripping lava—vertically moving lava that doesn’t bounce back and
forth but only moves down, jumping back to its start position when it
hits the floor.
A whole game consists of multiple levels that the player must complete. A level is completed when all coins have been collected. If the player touches lava, the current level is restored to its starting position, and the player may try again.
Reading a level
The following constructor builds a level object. Its argument should be the array of strings that define the level.
function Level(plan) {
  this.width = plan[0].length;
  this.height = plan.length;
  this.grid = [];
  this.actors = [];

  for (var y = 0; y < this.height; y++) {
    var line = plan[y], gridLine = [];
    for (var x = 0; x < this.width; x++) {
      var ch = line[x], fieldType = null;
      var Actor = actorChars[ch];
      if (Actor)
        this.actors.push(new Actor(new Vector(x, y), ch));
      else if (ch == "x")
        fieldType = "wall";
      else if (ch == "!")
        fieldType = "lava";
      gridLine.push(fieldType);
    }
    this.grid.push(gridLine);
  }

  this.player = this.actors.filter(function(actor) {
    return actor.type == "player";
  })[0];
  this.status = this.finishDelay = null;
}
For brevity, the code does not check for malformed input. It assumes that you’ve given it a proper level plan, complete with a player start position and other essentials.
A level stores its width and height, along with two
arrays—one for the grid and one for the actors, which are the dynamic
elements. The grid is represented as an array of arrays, where each of
the inner arrays represents a horizontal line and each square
contains either null, for empty squares, or a string indicating the
type of the square—"wall" or "lava".
The actors array holds objects that track the current position and
state of the dynamic elements in the level. Each of these is
expected to have a pos property that gives its position (the
coordinates of its top-left corner), a size property that gives its
size, and a type property that holds a string identifying the
element ("lava", "coin", or "player").
After building the grid, we use the filter method
to find the player actor object, which we store in a property of the
level. The status property tracks whether the player has won or
lost. When this happens, finishDelay is used to keep the level active
for a short period of time so that a simple animation can be
shown. (Immediately resetting or advancing the level would look
cheap.) This method can be used to find out whether a level is
finished:
Level.prototype.isFinished = function() {
  return this.status != null && this.finishDelay < 0;
};
Actors
To store the position and
size of an actor, we will return to our trusty Vector type, which
groups an x-coordinate and a y-coordinate into an object.
function Vector(x, y) {
  this.x = x; this.y = y;
}
Vector.prototype.plus = function(other) {
  return new Vector(this.x + other.x, this.y + other.y);
};
Vector.prototype.times = function(factor) {
  return new Vector(this.x * factor, this.y * factor);
};
The times method scales a
vector by a given amount. It will be useful when we need to multiply a
speed vector by a time interval to get the distance traveled during
that time.
In the previous section, the actorChars object was used by
the Level constructor to associate characters with constructor
functions. The object looks like this:
var actorChars = {
  "@": Player,
  "o": Coin,
  "=": Lava, "|": Lava, "v": Lava
};
Three characters map to Lava. The Level
constructor passes the actor’s source character as the second argument to
the constructor, and the Lava constructor uses that to adjust its
behavior (bouncing horizontally, bouncing vertically, or dripping).
The player type is built with the
following constructor. It has a property speed that stores its current
speed, which will help simulate momentum and gravity.
function Player(pos) {
  this.pos = pos.plus(new Vector(0, -0.5));
  this.size = new Vector(0.8, 1.5);
  this.speed = new Vector(0, 0);
}
Player.prototype.type = "player";
Because a player is one-and-a-half squares high, its initial position
is set to be half a square above the position where the @ character
appeared. This way, its bottom aligns with the bottom of the square
it appeared in.
When constructing a dynamic Lava
object, we need to initialize the object differently depending on the
character it is based on. Dynamic lava moves along at its given speed
until it hits an obstacle. At that point, if it has a repeatPos
property, it will jump back to its start position (dripping). If it
does not, it will invert its speed and continue in the other direction
(bouncing). The constructor only sets up the necessary properties. The
method that does the actual moving will be written
later.
function Lava(pos, ch) {
  this.pos = pos;
  this.size = new Vector(1, 1);
  if (ch == "=") {
    this.speed = new Vector(2, 0);
  } else if (ch == "|") {
    this.speed = new Vector(0, 2);
  } else if (ch == "v") {
    this.speed = new Vector(0, 3);
    this.repeatPos = pos;
  }
}
Lava.prototype.type = "lava";
Coin actors are simple. They mostly
just sit in their place. But to liven up the game a little, they are
given a “wobble”, a slight vertical motion back and forth. To track
this, a coin object stores a base position as well as a wobble
property that tracks the phase of the bouncing motion. Together,
these determine the coin’s actual position (stored in the pos
property).
function Coin(pos) {
  this.basePos = this.pos = pos.plus(new Vector(0.2, 0.1));
  this.size = new Vector(0.6, 0.6);
  this.wobble = Math.random() * Math.PI * 2;
}
Coin.prototype.type = "coin";
In
Chapter 13, we saw that Math.sin gives us
the y-coordinate of a point on a circle. That coordinate goes back and
forth in a smooth wave form as we move along the circle, which makes
the sine function useful for modeling a wavy motion.
To avoid a situation where all
coins move up and down synchronously, the starting phase of each coin
is randomized. The phase of Math.sin's wave, the width of a wave
it produces, is 2π. We multiply the value returned by Math.random
by that number to give the coin a random starting position on the wave.
We have now written all the parts needed to represent the state of a level.
var simpleLevel = new Level(simpleLevelPlan);
console.log(simpleLevel.width, "by", simpleLevel.height);
// → 22 by 9
The task ahead is to display such levels on the screen and to model time and motion inside them.
Encapsulation as a burden
Most of the code in this chapter does not worry about encapsulation for two reasons. First, encapsulation takes extra effort. It makes programs bigger and requires additional concepts and interfaces to be introduced. Since there is only so much code you can throw at a reader before their eyes glaze over, I’ve made an effort to keep the program small.
Second, the various elements in this game are so closely tied together that if the behavior of one of them changed, it is unlikely that any of the others would be able to stay the same. Interfaces between the elements would end up encoding a lot of assumptions about the way the game works. This makes them a lot less effective—whenever you change one part of the system, you still have to worry about the way it impacts the other parts because their interfaces wouldn’t cover the new situation.
Some cutting points in a system lend themselves well to separation through rigorous interfaces, but others don’t. Trying to encapsulate something that isn’t a suitable boundary is a sure way to waste a lot of energy. When you are making this mistake, you’ll usually notice that your interfaces are getting awkwardly large and detailed and that they need to be modified often, as the program evolves.
There is one thing that we will encapsulate in this chapter, and that is the drawing subsystem. The reason for this is that we will display the same game in a different way in the next chapter. By putting the drawing behind an interface, we can simply load the same game program there and plug in a new display module.
Drawing
The encapsulation of the drawing code is done
by defining a display object, which displays a given level.
The display type we define in this chapter is called DOMDisplay
because it uses simple DOM elements to show the level.
We will be using a style sheet to set the
actual colors and other fixed properties of the elements that make up
the game. It would also be possible to directly assign to the
elements’ style property when we create them, but that would produce
more verbose programs.
The following helper function provides a short way to create an element and give it a class:
function elt(name, className) {
  var elt = document.createElement(name);
  if (className) elt.className = className;
  return elt;
}
A display is created by giving it a parent element to which it should append itself and a level object.
function DOMDisplay(parent, level) {
  this.wrap = parent.appendChild(elt("div", "game"));
  this.level = level;

  this.wrap.appendChild(this.drawBackground());
  this.actorLayer = null;
  this.drawFrame();
}
We used the fact that appendChild returns
the appended element to create the wrapper element and store it in the
wrap property in a single statement.
The level’s background, which never changes, is drawn
once. The actors are redrawn every time the display is updated. The
actorLayer property will be used by drawFrame to track the element
that holds the actors so that they can be easily removed and
replaced.
Our coordinates and sizes are
tracked in units relative to the grid size, where a size or
distance of 1 means 1 grid unit. When setting pixel sizes, we
will have to scale these coordinates up—everything in the game would be ridiculously
small at a single pixel per square. The scale variable gives the
number of pixels that a single unit takes up on the screen.
var scale = 20;

DOMDisplay.prototype.drawBackground = function() {
  var table = elt("table", "background");
  table.style.width = this.level.width * scale + "px";
  this.level.grid.forEach(function(row) {
    var rowElt = table.appendChild(elt("tr"));
    rowElt.style.height = scale + "px";
    row.forEach(function(type) {
      rowElt.appendChild(elt("td", type));
    });
  });
  return table;
};
As mentioned earlier, the
background is drawn as a <table> element. This nicely corresponds to
the structure of the grid property in the level—each row of the grid
is turned into a table row (<tr> element). The strings in the grid
are used as class names for the table cell (<td>) elements. The
following CSS helps the resulting table look like the background we
want:
.background    { background: rgb(52, 166, 251);
                 table-layout: fixed;
                 border-spacing: 0;              }
.background td { padding: 0;                     }
.lava          { background: rgb(255, 100, 100); }
.wall          { background: white;              }
Some of these (table-layout, border-spacing,
and padding) are simply used to suppress unwanted default behavior.
We don’t want the layout of the table to depend upon the contents
of its cells, and we don’t want space between the table cells or
padding inside them.
The background rule
sets the background color. CSS allows colors to be specified both as
words (white) and with a format such as rgb(R, G, B), where the red,
green, and blue components of the color are separated into three
numbers from 0 to 255. So, in rgb(52, 166, 251), the red component is
52, green is 166, and blue is 251. Since the blue component is the
largest, the resulting color will be bluish. You can see that in the
.lava rule, the first number (red) is the largest.
We draw each actor by creating a DOM element for it and
setting that element’s position and size based on the actor’s properties. The
values have to be multiplied by scale to go from game units to
pixels.
DOMDisplay.prototype.drawActors = function() {
  var wrap = elt("div");
  this.level.actors.forEach(function(actor) {
    var rect = wrap.appendChild(elt("div",
                                    "actor " + actor.type));
    rect.style.width = actor.size.x * scale + "px";
    rect.style.height = actor.size.y * scale + "px";
    rect.style.left = actor.pos.x * scale + "px";
    rect.style.top = actor.pos.y * scale + "px";
  });
  return wrap;
};
To give an element more than one
class, we separate the class names by spaces. In the
CSS code shown next, the actor class gives the actors their
absolute position. Their type name is used as an extra class to give
them a color. We don’t have to define the lava class again because we reuse
the class for the lava grid squares which we defined earlier.
.actor  { position: absolute;            }
.coin   { background: rgb(241, 229, 89); }
.player { background: rgb(64, 64, 64);   }
When it updates the
display, the drawFrame method first removes the old actor graphics,
if any, and then redraws them in their new positions. It may be
tempting to try to reuse the DOM elements for actors, but to make
that work, we would need a lot of additional information flow between
the display code and the simulation code. We’d need to associate
actors with DOM elements, and the drawing code must remove
elements when their actors vanish. Since there will typically be only
a handful of actors in the game, redrawing all of them is not
expensive.
DOMDisplay.prototype.drawFrame = function() {
  if (this.actorLayer)
    this.wrap.removeChild(this.actorLayer);
  this.actorLayer = this.wrap.appendChild(this.drawActors());
  this.wrap.className = "game " + (this.level.status || "");
  this.scrollPlayerIntoView();
};
By adding the level’s current status as a class name to the wrapper, we can style the player actor slightly differently when the game is won or lost by adding a CSS rule that takes effect only when the player has an ancestor element with a given class.
.lost .player {
  background: rgb(160, 64, 64);
}
.won .player {
  box-shadow: -4px -7px 8px white, 4px -7px 8px white;
}
After touching lava, the player’s color turns dark red, suggesting scorching. When the last coin has been collected, we use two blurred white box shadows, one to the top left and one to the top right, to create a white halo effect.
We can’t assume that
levels always fit in the viewport. That is why the
scrollPlayerIntoView call is needed—it ensures that if the level is
protruding outside the viewport, we scroll that viewport to make
sure the player is near its center. The following CSS gives the
game’s wrapping DOM element a maximum size and ensures that
anything that sticks out of the element’s box is not visible. We also give the outer element a relative
position so that the actors inside it are positioned relative to
the level’s top-left corner.
.game {
  overflow: hidden;
  max-width: 600px;
  max-height: 450px;
  position: relative;
}
In the scrollPlayerIntoView method, we find the
player’s position and update the wrapping element’s scroll position.
We change the scroll position by manipulating that element’s scrollLeft
and scrollTop properties when the player is too close to the edge.
DOMDisplay.prototype.scrollPlayerIntoView = function() {
  var width = this.wrap.clientWidth;
  var height = this.wrap.clientHeight;
  var margin = width / 3;

  // The viewport
  var left = this.wrap.scrollLeft, right = left + width;
  var top = this.wrap.scrollTop, bottom = top + height;

  var player = this.level.player;
  var center = player.pos.plus(player.size.times(0.5))
                 .times(scale);

  if (center.x < left + margin)
    this.wrap.scrollLeft = center.x - margin;
  else if (center.x > right - margin)
    this.wrap.scrollLeft = center.x + margin - width;
  if (center.y < top + margin)
    this.wrap.scrollTop = center.y - margin;
  else if (center.y > bottom - margin)
    this.wrap.scrollTop = center.y + margin - height;
};
The way the player’s
center is found shows how the methods on our Vector type allow
computations with objects to be written in a readable way. To
find the actor’s center, we add its position (its top-left corner) and
half its size. That is the center in level coordinates, but we need it
in pixel coordinates, so we then multiply the resulting vector by our
display scale.
Next, a series of checks verify that the player
position isn’t outside of the allowed range. Note that sometimes this
will set nonsense scroll coordinates, below zero or beyond the
element’s scrollable area. This is okay—the DOM will constrain them to
sane values. Setting scrollLeft to -10 will cause it to become 0.
It would have been slightly simpler to always try to scroll the player to the center of the viewport. But this creates a rather jarring effect. As you are jumping, the view will constantly shift up and down. It is more pleasant to have a “neutral” area in the middle of the screen where you can move around without causing any scrolling.
Finally, we’ll need a way to clear a displayed level, to be used when the game moves to the next level or resets a level.
DOMDisplay.prototype.clear = function() {
  this.wrap.parentNode.removeChild(this.wrap);
};
We are now able to display our tiny level.
<link rel="stylesheet" href="css/game.css">

<script>
  var simpleLevel = new Level(simpleLevelPlan);
  var display = new DOMDisplay(document.body, simpleLevel);
</script>
The <link> tag, when used
with rel="stylesheet", is a way to load a CSS file into a page. The
file game.css contains the styles necessary for our game.
Motion and collision
Now we’re at the point where we can start adding motion—the most interesting aspect of the game. The basic approach, taken by most games like this, is to split time into small steps and, for each step, move the actors by a distance corresponding to their speed (distance moved per second) multiplied by the size of the time step (in seconds).
That is easy. The difficult part is dealing with the interactions between the elements. When the player hits a wall or floor, they should not simply move through it. The game must notice when a given motion causes an object to hit another object and respond accordingly. For walls, the motion must be stopped. For coins, the coin must be collected, and so on.
Solving this for the general case is a big task. You can find libraries, usually called physics engines, that simulate interaction between physical objects in two or three dimensions. We’ll take a more modest approach in this chapter, handling only collisions between rectangular objects and handling them in a rather simplistic way.
Before moving the player or a block of lava, we test whether the motion would take it inside of a nonempty part of the background. If it does, we simply cancel the motion altogether. The response to such a collision depends on the type of actor—the player will stop, whereas a lava block will bounce back.
This approach requires our time steps to be rather small since it will cause motion to stop before the objects actually touch. If the time steps (and thus the motion steps) are too big, the player would end up hovering a noticeable distance above the ground. Another approach, arguably better but more complicated, would be to find the exact collision spot and move there. We will take the simple approach and hide its problems by ensuring the animation proceeds in small steps.
This method tells us whether a rectangle (specified by a position and a size) overlaps with any nonempty space on the background grid:
Level.prototype.obstacleAt = function(pos, size) {
  var xStart = Math.floor(pos.x);
  var xEnd = Math.ceil(pos.x + size.x);
  var yStart = Math.floor(pos.y);
  var yEnd = Math.ceil(pos.y + size.y);

  if (xStart < 0 || xEnd > this.width || yStart < 0)
    return "wall";
  if (yEnd > this.height)
    return "lava";
  for (var y = yStart; y < yEnd; y++) {
    for (var x = xStart; x < xEnd; x++) {
      var fieldType = this.grid[y][x];
      if (fieldType) return fieldType;
    }
  }
};
This method computes the set
of grid squares that the body overlaps with by using Math.floor
and Math.ceil on the body’s coordinates. Remember that grid squares
are 1×1 units in size. By rounding the sides of a box up and
down, we get the range of background squares that the box touches.

If the body sticks out of the level, we always return "wall" for the
sides and top and "lava" for the bottom. This ensures that the
player dies when falling out of the world. When the body is fully
inside the grid, we loop over the block of grid squares found by
rounding the coordinates and return the content of the first
nonempty square we find.
Collisions between the player and other dynamic actors (coins, moving lava) are handled after the player moved. When the motion has taken the player into another actor, the appropriate effect—collecting a coin or dying—is activated.
This method scans the array of actors, looking for an actor that overlaps the one given as an argument:
Level.prototype.actorAt = function(actor) {
  for (var i = 0; i < this.actors.length; i++) {
    var other = this.actors[i];
    if (other != actor &&
        actor.pos.x + actor.size.x > other.pos.x &&
        actor.pos.x < other.pos.x + other.size.x &&
        actor.pos.y + actor.size.y > other.pos.y &&
        actor.pos.y < other.pos.y + other.size.y)
      return other;
  }
};
Actors and actions
The animate method
on the Level type gives all actors in the level a chance to move.
Its step argument is the time step in seconds. The keys object
contains information about the arrow keys the player has pressed.
var maxStep = 0.05;

Level.prototype.animate = function(step, keys) {
  if (this.status != null)
    this.finishDelay -= step;

  while (step > 0) {
    var thisStep = Math.min(step, maxStep);
    this.actors.forEach(function(actor) {
      actor.act(thisStep, this, keys);
    }, this);
    step -= thisStep;
  }
};
When the level’s status property has a
non-null value (which is the case when the player has won or lost), we
must count down the finishDelay property, which tracks the time
between the point where winning or losing happens and the point where
we want to stop showing the level.
The while loop cuts the time
step we are animating into suitably small pieces. It ensures that no
step larger than maxStep is taken. For example, a step of 0.12
second would be cut into two steps of 0.05 seconds and one step of 0.02.
Actor objects have an act
method, which takes as arguments the time step, the level object, and
the keys object. Here is one, for the Lava actor type,
which ignores the keys object:
Lava.prototype.act = function(step, level) {
  var newPos = this.pos.plus(this.speed.times(step));
  if (!level.obstacleAt(newPos, this.size))
    this.pos = newPos;
  else if (this.repeatPos)
    this.pos = this.repeatPos;
  else
    this.speed = this.speed.times(-1);
};
It computes a new position by adding the product of the
time step and its current speed to its old position. If no
obstacle blocks that new position, it moves there. If there is an
obstacle, the behavior depends on the type of the lava
block—dripping lava has a repeatPos property, to which it jumps back
when it hits something. Bouncing lava simply inverts its speed
(multiplies it by -1) in order to start moving in the other direction.
Coins use their act method to
wobble. They ignore collisions since they are simply wobbling around
inside of their own square, and collisions with the player will be
handled by the player's act method.
var wobbleSpeed = 8, wobbleDist = 0.07;

Coin.prototype.act = function(step) {
  this.wobble += step * wobbleSpeed;
  var wobblePos = Math.sin(this.wobble) * wobbleDist;
  this.pos = this.basePos.plus(new Vector(0, wobblePos));
};
The wobble property is
updated to track time and then used as an argument to Math.sin to
create a wave, which is used to compute a new position.
That leaves the player itself. Player motion is handled separately per axis because hitting the floor should not prevent horizontal motion, and hitting a wall should not stop falling or jumping motion. This method implements the horizontal part:
var playerXSpeed = 7;

Player.prototype.moveX = function(step, level, keys) {
  this.speed.x = 0;
  if (keys.left) this.speed.x -= playerXSpeed;
  if (keys.right) this.speed.x += playerXSpeed;

  var motion = new Vector(this.speed.x * step, 0);
  var newPos = this.pos.plus(motion);
  var obstacle = level.obstacleAt(newPos, this.size);
  if (obstacle)
    level.playerTouched(obstacle);
  else
    this.pos = newPos;
};
The horizontal motion is computed based on the state
of the left and right arrow keys. When a motion causes the player to
hit something, the level’s playerTouched method, which handles
things like dying in lava and collecting coins, is called.
Otherwise, the object updates its position.
Vertical motion works in a similar way but has to simulate jumping and gravity.
var gravity = 30;
var jumpSpeed = 17;

Player.prototype.moveY = function(step, level, keys) {
  this.speed.y += step * gravity;
  var motion = new Vector(0, this.speed.y * step);
  var newPos = this.pos.plus(motion);
  var obstacle = level.obstacleAt(newPos, this.size);
  if (obstacle) {
    level.playerTouched(obstacle);
    if (keys.up && this.speed.y > 0)
      this.speed.y = -jumpSpeed;
    else
      this.speed.y = 0;
  } else {
    this.pos = newPos;
  }
};
At the start of the method, the player is accelerated vertically to account for gravity. The gravity, jumping speed, and pretty much all other constants in this game have been set by trial and error. I tested various values until I found a combination I liked.
Next, we check for obstacles again. If we hit an obstacle, there are two possible outcomes. When the up arrow is pressed and we are moving down (meaning the thing we hit is below us), the speed is set to a relatively large, negative value. This causes the player to jump. If that is not the case, we simply bumped into something, and the speed is reset to zero.
The actual act method looks like this:
Player.prototype.act = function(step, level, keys) {
  this.moveX(step, level, keys);
  this.moveY(step, level, keys);

  var otherActor = level.actorAt(this);
  if (otherActor)
    level.playerTouched(otherActor.type, otherActor);

  // Losing animation
  if (level.status == "lost") {
    this.pos.y += step;
    this.size.y -= step;
  }
};
After moving, the method checks for other actors that the
player is colliding with and again calls playerTouched when it
finds one. This time, it passes the actor object as the second argument
because if the other actor is a coin, playerTouched needs to
know which coin is being collected.
Finally, when the player dies (touches lava), we set up a little animation that causes them to “shrink” or “sink” down by reducing the height of the player object.
And here is the method that handles collisions between the player and other objects:
Level.prototype.playerTouched = function(type, actor) {
  if (type == "lava" && this.status == null) {
    this.status = "lost";
    this.finishDelay = 1;
  } else if (type == "coin") {
    this.actors = this.actors.filter(function(other) {
      return other != actor;
    });
    if (!this.actors.some(function(actor) {
      return actor.type == "coin";
    })) {
      this.status = "won";
      this.finishDelay = 1;
    }
  }
};
When lava is touched, the game’s status is set to "lost". When a
coin is touched, that coin is removed from the array of actors,
and if it was the last one, the game’s status is set to "won".
This gives us a level that can actually be animated. All that is missing now is the code that drives the animation.
Tracking keys
For a game like this, we do not want keys to take effect once per keypress. Rather, we want their effect (moving the player figure) to continue happening as long as they are pressed.
We need to set up a key handler that stores
the current state of the left, right, and up arrow keys. We will also want
to call preventDefault for those keys so that they don’t end up
scrolling the page.
The following function, when given
an object with key codes as property names and key names as values,
will return an object that tracks the current position of those keys.
It registers event handlers for "keydown" and "keyup" events and,
when the key code in the event is present in the set of codes that it
is tracking, updates the object.
var arrowCodes = {37: "left", 38: "up", 39: "right"};

function trackKeys(codes) {
  var pressed = Object.create(null);
  function handler(event) {
    if (codes.hasOwnProperty(event.keyCode)) {
      var down = event.type == "keydown";
      pressed[codes[event.keyCode]] = down;
      event.preventDefault();
    }
  }
  addEventListener("keydown", handler);
  addEventListener("keyup", handler);
  return pressed;
}
Note how the same handler function
is used for both event types. It looks at the event object’s type
property to determine whether the key state should be updated to true
("keydown") or false ("keyup").
Running the game
The
requestAnimationFrame function, which we saw in
Chapter 13, provides a good way to
animate a game. But its interface is quite primitive—using it requires
us to track the time at which our function was called the last time
around and call requestAnimationFrame again after every frame.
Let’s define a helper function that
wraps those boring parts in a convenient interface and allows us to
simply call runAnimation, giving it a function that expects a time
difference as an argument and draws a single frame. When the frame
function returns the value false, the animation stops.
function runAnimation(frameFunc) {
  var lastTime = null;
  function frame(time) {
    var stop = false;
    if (lastTime != null) {
      var timeStep = Math.min(time - lastTime, 100) / 1000;
      stop = frameFunc(timeStep) === false;
    }
    lastTime = time;
    if (!stop)
      requestAnimationFrame(frame);
  }
  requestAnimationFrame(frame);
}
I have set a maximum frame step of 100
milliseconds (one-tenth of a second). When the browser tab or window
with our page is hidden, requestAnimationFrame calls will be
suspended until the tab or window is shown again. In this case, the difference
between lastTime and time will be the entire time in which the
page was hidden. Advancing the game by that much in a single step will
look silly and might be a lot of work (remember the time-splitting in
the animate method).
The function also converts the time steps to seconds, which are an easier quantity to think about than milliseconds.
The runLevel function
takes a Level object, a constructor for a display, and,
optionally, a function. It displays the level (in document.body) and
lets the user play through it. When the level is finished (lost or
won), runLevel clears the display, stops the animation, and, if an
andThen function was given, calls that function with the level’s status.
var arrows = trackKeys(arrowCodes);

function runLevel(level, Display, andThen) {
  var display = new Display(document.body, level);
  runAnimation(function(step) {
    level.animate(step, arrows);
    display.drawFrame(step);
    if (level.isFinished()) {
      display.clear();
      if (andThen)
        andThen(level.status);
      return false;
    }
  });
}
A game is a sequence of levels. Whenever the player dies, the current level is restarted. When a level is completed, we move on to the next level. This can be expressed by the following function, which takes an array of level plans (arrays of strings) and a display constructor:
function runGame(plans, Display) {
  function startLevel(n) {
    runLevel(new Level(plans[n]), Display, function(status) {
      if (status == "lost")
        startLevel(n);
      else if (n < plans.length - 1)
        startLevel(n + 1);
      else
        console.log("You win!");
    });
  }
  startLevel(0);
}
These functions show
a peculiar style of programming. Both runAnimation and runLevel
are higher-order functions but are not in the style we saw in
Chapter 5. The function
argument is used to arrange things to happen at some time in the
future, and neither of the functions returns anything useful. Their
task is, in a way, to schedule actions. Wrapping these actions in
functions gives us a way to store them as a value so that they can be
called at the right moment.
This programming style is usually called asynchronous programming. Event handling is also an instance of this style, and we will see much more of it when working with tasks that can take an arbitrary amount of time, such as network requests in Chapter 17 and input and output in general in Chapter 20.
There is a set of
level plans available in the GAME_LEVELS variable .
This page feeds them to runGame, starting an actual game:
<link rel="stylesheet" href="css/game.css">

<body>
  <script>
    runGame(GAME_LEVELS, DOMDisplay);
  </script>
</body>
See if you can beat those. I had quite a lot of fun building them.
Exercises
Game over
It’s traditional for platform games to have the player start with a limited number of lives and subtract one life each time they die. When the player is out of lives, the game restarts from the beginning.
Adjust runGame to implement lives. Have the
player start with three.
<link rel="stylesheet" href="css/game.css">

<body>
<script>
  // The old runGame function. Modify it...
  function runGame(plans, Display) {
    function startLevel(n) {
      runLevel(new Level(plans[n]), Display, function(status) {
        if (status == "lost")
          startLevel(n);
        else if (n < plans.length - 1)
          startLevel(n + 1);
        else
          console.log("You win!");
      });
    }
    startLevel(0);
  }
  runGame(GAME_LEVELS, DOMDisplay);
</script>
</body>
The most obvious solution
would be to make lives a variable that lives in runGame and is
thus visible to the startLevel closure.
Another approach, which fits nicely with the spirit of the rest of the
function, would be to add a second parameter to startLevel that
gives the number of lives. When the whole state of a system is stored
in the arguments to a function, calling that function provides an
elegant way to transition to a new state.
In any case, when a level is lost, there should now be two possible state transitions. If that was the last life, we go back to level zero with the starting amount of lives. If not, we repeat the current level with one less life remaining.
Pausing the game
Make it possible to pause (suspend) and unpause the game by pressing the Esc key.
This can be done by
changing the runLevel function to use another keyboard event
handler and interrupting or resuming the animation whenever the
Esc key is hit.
The runAnimation interface may not look
like it is suitable for this at first glance, but it is, if you
rearrange the way runLevel calls it.
When you have that
working, there is something else you could try. The way we have been
registering keyboard event handlers is somewhat problematic. The
arrows object is currently a global variable, and its event handlers
are kept around even when no game is running. You could say they leak out of
our system. Extend trackKeys to provide a way to
unregister its handlers, and then change runLevel to register its
handlers when it starts and unregister them again when it is
finished.
<link rel="stylesheet" href="css/game.css">

<body>
<script>
  // The old runLevel function. Modify this...
  function runLevel(level, Display, andThen) {
    var display = new Display(document.body, level);
    runAnimation(function(step) {
      level.animate(step, arrows);
      display.drawFrame(step);
      if (level.isFinished()) {
        display.clear();
        if (andThen)
          andThen(level.status);
        return false;
      }
    });
  }
  runGame(GAME_LEVELS, DOMDisplay);
</script>
</body>
An animation can be interrupted by
returning false from the function given to runAnimation. It can be
continued by calling runAnimation again.
To communicate that the animation should be
interrupted to the function passed to runAnimation so that it can
return false, you can use a variable that both the event handler and
that function have access to.
When finding a way to unregister the handlers registered by
trackKeys, remember that the exact same function value that was
passed to addEventListener must be passed to removeEventListener
to successfully remove a handler. Thus, the handler function value
created in trackKeys must be available to the code that unregisters
the handlers.
You can add a property to the object returned by trackKeys,
containing either that function value or a method that handles the
unregistering directly.