Chapter 12: The Document-Object Model
¶ In chapter 11 we saw JavaScript objects referring to form and input
tags from the HTML document. Such objects are part of a structure
called the Document-Object Model (DOM). Every tag of the document
is represented in this model, and can be looked up and interacted
with.
¶ HTML documents have what is called a hierarchical structure. Each
element (or tag) except the top <html> tag is contained in another
element, its parent. This element can in turn contain child elements.
You can visualise this as a kind of family tree:
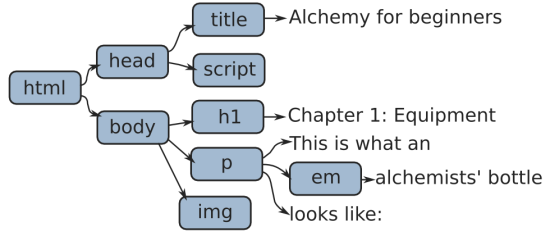
¶ The document-object model is based on such a view of the document. Note that the tree contains two types of elements: Nodes, which are shown as blue boxes, and pieces of simple text. The pieces of text, as we will see, work somewhat different than the other elements. For one thing, they never have children.
¶ Open the file example_alchemy.html, which contains the document
shown in the picture, and attach the console to it.
attach(window.open("example_alchemy.html"));
¶ The object for the root of the document
tree, the html node, can be reached through the documentElement
property of the document object. Most of the time, we need access to
the body part of the document instead, which is at
document.body.
¶ The links between these nodes are available as properties of the node
objects. Every DOM object has a parentNode property, which refers
to the object in which it is contained, if any. These parents also
have links pointing back to their children, but because there can be
more than one child, these are stored in a pseudo-array called
childNodes.
show(document.body);
show(document.body.parentNode);
show(document.body.childNodes.length);
¶ For convenience, there are also links called firstChild and
lastChild, pointing at the first and last child inside a node, or
null when there are no children.
show(document.documentElement.firstChild);
show(document.documentElement.lastChild);
¶ Finally, there are properties called nextSibling and
previousSibling, which point at the nodes sitting 'next' to a node
― nodes that are children of the same parent, coming before or after
the current node. Again, when there is no such sibling, the value of
these properties is null.
show(document.body.previousSibling);
show(document.body.nextSibling);
¶ To find out whether a node represents a simple piece of text or an
actual HTML node, we can look at its nodeType property. This
contains a number, 1 for regular nodes and 3 for text nodes. There
are actually other kinds of objects with a nodeType, such as the
document object, which has 9, but the most common use for this
property is distinguishing between text nodes and other nodes.
function isTextNode(node) {
  return node.nodeType == 3;
}

show(isTextNode(document.body));
show(isTextNode(document.body.firstChild.firstChild));
¶ Regular nodes have a property called nodeName, indicating the type
of HTML tag that they represent. Text nodes, on the other hand, have a
nodeValue, containing their text content.
show(document.body.firstChild.nodeName);
show(document.body.firstChild.firstChild.nodeValue);
¶ The nodeNames are always capitalised, which is something you need to
take into account if you ever want to compare them to something.
function isImage(node) {
  return !isTextNode(node) && node.nodeName == "IMG";
}

show(isImage(document.body.lastChild));
¶ Write a function asHTML which, when given a DOM node, produces a
string representing the HTML text for that node and its children. You
may ignore attributes, just show nodes as <nodename>. The
escapeHTML function from chapter 10 is available to properly escape
the content of text nodes.
¶ Hint: Recursion!
function asHTML(node) {
  if (isTextNode(node))
    return escapeHTML(node.nodeValue);
  else if (node.childNodes.length == 0)
    return "<" + node.nodeName + "/>";
  else
    return "<" + node.nodeName + ">" +
           map(asHTML, node.childNodes).join("") +
           "</" + node.nodeName + ">";
}

print(asHTML(document.body));
¶ Nodes, in fact, already have something similar to asHTML. Their
innerHTML property can be used to retrieve the HTML text inside
of the node, without the tags for the node itself. Some browsers also
support outerHTML, which does include the node itself, but not all
of them.
print(document.body.innerHTML);
¶ Some of these properties can also be modified. Setting the innerHTML
of a node or the nodeValue of a text-node will change its content.
Note that, in the first case, the given string is interpreted as HTML,
while in the second case it is interpreted as plain text.
document.body.firstChild.firstChild.nodeValue =
  "Chapter 1: The deep significance of the bottle";
¶ Or ...
document.body.firstChild.innerHTML =
  "Did you know the 'blink' tag yet? <blink>Joy!</blink>";
¶ We have been accessing nodes by going through a series of firstChild
and lastChild properties. This can work, but it is verbose and easy
to break ― if we add another node at the start of our document,
document.body.firstChild no longer refers to the h1 element, and
code which assumes it does will go wrong. On top of that, some
browsers will add text-nodes for things like spaces and newlines
between tags, while others do not, so that the exact layout of the DOM
tree can vary.
¶ An alternative to this is to give elements that you need to have
access to an id attribute. In the example page, the picture has an
id "picture", and we can use this to look it up.
var picture = document.getElementById("picture");
show(picture.src);
picture.src = "img/ostrich.png";
¶ When typing getElementById, note that
the last letter is lowercase. Also, when typing it a lot, beware of
carpal-tunnel syndrome. Because document.getElementById is a
ridiculously long name for a very common operation, it has become a
convention among JavaScript programmers to aggressively abbreviate it
to $. $, as you might remember, is considered a letter by
JavaScript, and is thus a valid variable name.
function $(id) {
  return document.getElementById(id);
}
show($("picture"));
¶ DOM nodes also have a method getElementsByTagName (another nice,
short name), which, when given a tag name, returns an array of all
nodes of that type contained in the node it was called on.
show(document.body.getElementsByTagName("BLINK")[0]);
¶ Another thing we can do with these DOM nodes is creating new ones ourselves. This makes it possible to add pieces to a document at will, which can be used to create some interesting effects. Unfortunately, the interface for doing this is extremely clumsy. But that can be remedied with some helper functions.
¶ The document
object has createElement and createTextNode methods. The first is
used to create regular nodes, the second, as the name suggests,
creates text nodes.
var secondHeader = document.createElement("H1");
var secondTitle = document.createTextNode("Chapter 2: Deep magic");
¶ Next, we'll want to put the title name into the h1 element, and then
add the element to the document. The simplest way to do this is the
appendChild method, which can be called on every (non-text) node.
secondHeader.appendChild(secondTitle);
document.body.appendChild(secondHeader);
¶ Often, you will also want to give these new nodes some attributes. For
example, an img (image) tag is rather useless without an src
property telling the browser which image it should show. Most
attributes can be approached directly as properties of the DOM nodes,
but there are also methods setAttribute and getAttribute,
which are used to access attributes in a more general way:
var newImage = document.createElement("IMG");
newImage.setAttribute("src", "img/Hiva Oa.png");
document.body.appendChild(newImage);
show(newImage.getAttribute("src"));
¶ But, when we want to build more than a few simple nodes, it gets very
tiresome to create every single node with a call to
document.createElement or document.createTextNode, and then add
its attributes and child nodes one by one. Fortunately, it is not hard
to write a function to do most of the work for us. Before we do so,
there is one little detail to take care of ― the setAttribute
method, while working fine on most browsers, does not always work on
Internet Explorer. The names of a few HTML attributes already have a
special meaning in JavaScript, and thus the corresponding object
properties got an adjusted name. Specifically, the class attribute
becomes className, for becomes htmlFor, and checked is
renamed to defaultChecked. On Internet Explorer, setAttribute and
getAttribute also work with these adjusted names, instead of the
original HTML names, which can be confusing. On top of that the
style attribute, which, along with class, will be discussed
later in this chapter, can not be set with setAttribute on that
browser.
¶ A workaround would look something like this:
function setNodeAttribute(node, attribute, value) {
  if (attribute == "class")
    node.className = value;
  else if (attribute == "checked")
    node.defaultChecked = value;
  else if (attribute == "for")
    node.htmlFor = value;
  else if (attribute == "style")
    node.style.cssText = value;
  else
    node.setAttribute(attribute, value);
}
¶ For every case where Internet Explorer deviates from other browsers, it does something that works in all cases. Don't worry about the details ― this is the kind of ugly trick that we'd rather not need, but which non-conforming browsers force us to write. Having this, it is possible to write a simple function for building DOM elements.
function dom(name, attributes) {
  var node = document.createElement(name);
  if (attributes) {
    forEachIn(attributes, function(name, value) {
      setNodeAttribute(node, name, value);
    });
  }
  for (var i = 2; i < arguments.length; i++) {
    var child = arguments[i];
    if (typeof child == "string")
      child = document.createTextNode(child);
    node.appendChild(child);
  }
  return node;
}

var newParagraph =
  dom("P", null, "A paragraph with a ",
      dom("A", {href: "http://en.wikipedia.org/wiki/Alchemy"},
          "link"),
      " inside of it.");
document.body.appendChild(newParagraph);
¶ The dom function creates a DOM node. Its first argument gives the
tag name of the node, its second argument is an object containing the
attributes of the node, or null when no attributes are needed. After
that, any amount of arguments may follow, and these are added to the
node as child nodes. When strings appear here, they are first put into
a text node.
¶ appendChild is not the only way nodes can be inserted into another
node. When the new node should not appear at the end of its parent,
the insertBefore method can be used to place it in front of
another child node. It takes the new node as a first argument, and the
existing child as second argument.
var link = newParagraph.childNodes[1];
newParagraph.insertBefore(dom("STRONG", null, "great "), link);
¶ If a node that already has a parentNode is placed somewhere, it is
automatically removed from its current position ― nodes can not exist
in the document in more than one place.
¶ When a node must be replaced by another one, use the replaceChild
method, which again takes the new node as first argument and the
existing one as second argument.
newParagraph.replaceChild(document.createTextNode("lousy "),
                          newParagraph.childNodes[1]);
¶ And, finally, there is removeChild to remove a child node. Note
that this is called on the parent of the node to be removed, giving
the child as argument.
newParagraph.removeChild(newParagraph.childNodes[1]);
¶ Write the convenient function removeElement which removes the DOM
node it is given as an argument from its parent node.
function removeElement(node) {
  if (node.parentNode)
    node.parentNode.removeChild(node);
}

removeElement(newParagraph);
¶ When creating new nodes and moving nodes around it is necessary to be
aware of the following rule: Nodes are not allowed to be inserted into
another document from the one in which they were created. This means
that if you have extra frames or windows open, you can not take a
piece of the document from one and move it to another, and nodes
created with methods on one document object must stay in that
document. Some browsers, notably Firefox, do not enforce this
restriction, and thus a program which violates it will work fine in
those browsers but break on others.
¶ An example of something useful that can be done with this dom
function is a program that takes JavaScript objects and summarises
them in a table. Tables, in HTML, are created with a set of tags
starting with ts, something like this:
<table>
  <tbody>
    <tr> <th>Tree </th> <th>Flowers</th> </tr>
    <tr> <td>Apple</td> <td>White  </td> </tr>
    <tr> <td>Coral</td> <td>Red    </td> </tr>
    <tr> <td>Pine </td> <td>None   </td> </tr>
  </tbody>
</table>
¶ Each tr element is a row of the table. th and td elements are
the cells of the table, tds are normal data cells, th cells are
'header' cells, which will be displayed in a slightly more prominent
way. The tbody (table body) tag does not have to be included when a
table is written as HTML, but when building a table from DOM nodes it
should be added, because Internet Explorer refuses to display tables
created without a tbody.
¶ The function makeTable takes two arrays as arguments. The first
contains the JavaScript objects that it should summarise, and the
second contains strings, which name the columns of the table and the
properties of the objects that should be shown in these columns. For
example, the following will produce the table above:
makeTable([{Tree: "Apple", Flowers: "White"},
           {Tree: "Coral", Flowers: "Red"},
           {Tree: "Pine",  Flowers: "None"}],
          ["Tree", "Flowers"]);
¶ Write this function.
function makeTable(data, columns) {
  var headRow = dom("TR");
  forEach(columns, function(name) {
    headRow.appendChild(dom("TH", null, name));
  });

  var body = dom("TBODY", null, headRow);
  forEach(data, function(object) {
    var row = dom("TR");
    forEach(columns, function(name) {
      row.appendChild(dom("TD", null, String(object[name])));
    });
    body.appendChild(row);
  });

  return dom("TABLE", null, body);
}

var table = makeTable(document.body.childNodes,
                      ["nodeType", "tagName"]);
document.body.appendChild(table);
¶ Do not forget to convert the values from the objects to strings before
adding them to the table ― our dom function only understands
strings and DOM nodes.
¶ Closely tied to HTML and the document-object model is the topic of style-sheets. It is a big topic, and I will not discuss it entirely, but some understanding of style-sheets is necessary for a lot of interesting JavaScript techniques, so we will go over the basics.
¶ In old-fashioned HTML, the only way to change the appearance of
elements in a document was to give them extra attributes or to wrap
them in extra tags, such as center to center them horizontally, or
font to change the font style or colour. Most of the time, this meant
that if you wanted the paragraphs or the tables in your document to
look a certain way, you had to add a bunch of attributes and tags to
every single one of them. This quickly adds a lot of noise to such
documents, and makes them very painful to write or change by hand.
¶ Of course, people being the inventive monkeys they are, someone came up with a solution. Style-sheets are a way to make statements like 'in this document, all paragraphs use the Comic Sans font, and are purple, and all tables have a thick green border'. You specify them once, at the top of the document or in a separate file, and they affect the whole document. Here, for example, is a style-sheet to make headers 22 points big and centered, and make paragraphs use the font and colour mentioned earlier, when they are of the 'ugly' class.
<style type="text/css">
  h1 {
    font-size: 22pt;
    text-align: center;
  }

  p.ugly {
    font-family: Comic Sans MS;
    color: purple;
  }
</style>
¶ Classes are a concept related to styles. If you have different kinds
of paragraphs, ugly ones and nice ones for example, setting the style
for all p elements is not what you want, so classes can be used to
distinguish between them. The above style will only be applied to
paragraphs like this:
<p class="ugly">Mirror, mirror...</p>
¶ And this is also the meaning of the className property which was
briefly mentioned for the setNodeAttribute function. The style
attribute can be used to add a piece of style directly to an element.
For example, this gives our image a solid border 4 pixels ('px') wide.
setNodeAttribute($("picture"), "style",
                 "border-width: 4px; border-style: solid;");
¶ There is much more to styles: Some styles are inherited by child nodes
from parent nodes, and interfere with each other in complex and
interesting ways, but for the purpose of DOM programming, the most
important thing to know is that each DOM node has a style property,
which can be used to manipulate the style of that node, and that there
are a few kinds of styles that can be used to make nodes do
extraordinary things.
¶ This style property refers to an object, which has properties for
all the possible elements of the style. We can, for example, make the
picture's border green.
$("picture").style.borderColor = "green";
show($("picture").style.borderColor);
¶ Note that in style-sheets, the words are separated by hyphens, as in
border-color, while in JavaScript, capital letters are used to mark
the different words, as in borderColor.
¶ A very practical kind of style is display: none. This can be used to
temporarily hide a node: When style.display is "none", the element
does not appear at all to the viewer of the document, even though it
does exist. Later, display can be set to the empty string, and the
element will re-appear.
$("picture").style.display = "none";
¶ And, to get our picture back:
$("picture").style.display = "";
¶ Another set of style types that can be abused in interesting ways are those related to positioning. In a simple HTML document, the browser takes care of determining the screen positions of all the elements ― each element is put next to or below the elements that come before it, and nodes (generally) do not overlap.
¶ When its position style is set to "absolute", a
node is taken out of the normal document 'flow'. It no longer takes up
room in the document, but sort of floats above it. The left and
top styles can then be used to influence its position. This can be
used for various purposes, from making a node obnoxiously follow the
mouse cursor to making 'windows' open on top of the rest of the
document.
$("picture").style.position = "absolute";
var angle = 0;
var spin = setInterval(function() {
  angle += 0.1;
  $("picture").style.left = (100 + 100 * Math.cos(angle)) + "px";
  $("picture").style.top = (100 + 100 * Math.sin(angle)) + "px";
}, 100);
¶ If you aren't familiar with trigonometry, just believe me when I tell
you that the cosine and sine stuff is used to build coordinates lying
on the outline of a circle. Ten times per second, the angle at which
we place the picture is changed, and new coordinates are computed. It
is a common error, when setting styles like this, to forget to append
"px" to your value. In most cases, setting a style to a number
without a unit does not work, so you must add "px" for pixels, "%"
for percent, "em" for 'ems' (the width of an M character), or
"pt" for points.
¶ (Now put the image to rest again...)
clearInterval(spin);
¶ The place that is treated as 0,0 for the purpose of these positions
depends on the place of the node in the document. When it is placed
inside another node that has position: absolute or position:
relative, the top left of this node is used. Otherwise, you get the
top left corner of the document.
¶ One last aspect of DOM nodes that is
fun to play with is their size. There are style types called width
and height, which can be used to set the absolute size of an
element.
$("picture").style.width = "400px";
$("picture").style.height = "200px";
¶ But, when you need to accurately set the size of an element, there is an tricky problem to take into account. Some browsers, in some circumstances, take these sizes to mean the outside size of the object, including any border and internal padding. Other browsers, in other circumstances, use the size of the space inside of the object instead, and do not count the width of borders and padding. Thus, if you set the size of an object that has a border or a padding, it will not always appear the same size.
¶ Fortunately, you can inspect the inner and outer size of a node,
which, when you really need to accurately size something, can be used
to compensate for browser behaviour. The offsetWidth and
offsetHeight properties give you the outer size of your element
(the space it takes up in the document), while the clientWidth and
clientHeight properties give the space inside of it, if any.
print("Outer size: ", $("picture").offsetWidth,
      " by ", $("picture").offsetHeight, " pixels.");
print("Inner size: ", $("picture").clientWidth,
      " by ", $("picture").clientHeight, " pixels.");
¶ If you've followed through with all the examples in this chapter, and maybe did a few extra things by yourself, you will have completely mutilated the poor little document that we started with. Now let me moralise for a moment and tell you that you do not want to do this to real pages. The temptation to add all kinds of moving bling-bling will at times be strong. Resist it, or your pages shall surely become unreadable or even, if you go far enough, induce the occasional seizure.