Project: A Pixel Art Editor
I look at the many colors before me. I look at my blank canvas. Then, I try to apply colors like words that shape poems, like notes that shape music.
The material from the previous chapters gives you all the elements you need to build a basic web application. In this chapter, we will do just that.
Our application will be a pixel-drawing program that allows you to modify a picture pixel by pixel by manipulating a zoomed-in view of it, shown as a grid of colored squares. You can use the program to open image files, scribble on them with your mouse or other pointer device, and save them. This is what it will look like:
Painting on a computer is great. You don’t need to worry about materials, skill, or talent. You just start smearing and see where you end up.
Components
The interface for the application shows a big <canvas> element on top, with a number of form fields below it. The user draws on the picture by selecting a tool from a <select> field and then clicking, touching, or dragging across the canvas. There are tools for drawing single pixels or rectangles, for filling an area, and for picking a color from the picture.
We will structure the editor interface as a number of components, objects that are responsible for a piece of the DOM and that may contain other components inside them.
The state of the application consists of the current picture, the selected tool, and the selected color. We’ll set things up so that the state lives in a single value and the interface components always base the way they look on the current state.
To see why this is important, let’s consider the alternative—distributing pieces of state throughout the interface. Up to a certain point, this is easier to program. We can just put in a color field and read its value when we need to know the current color.
But then we add the color picker—a tool that lets you click the picture to select the color of a given pixel. To keep the color field showing the correct color, that tool would have to know that the color field exists and update it whenever it picks a new color. If you ever add another place that makes the color visible (maybe the mouse cursor could show it), you have to update your color-changing code to keep that synchronized as well.
In effect, this creates a problem where each part of the interface needs to know about all other parts, which is not very modular. For small applications like the one in this chapter, that may not be a problem. For bigger projects, it can turn into a real nightmare.
To avoid this nightmare on principle, we’re going to be strict about data flow. There is a state, and the interface is drawn based on that state. An interface component may respond to user actions by updating the state, at which point the components get a chance to synchronize themselves with this new state.
In practice, each component is set up so that when it is given a new state, it also notifies its child components, insofar as those need to be updated. Setting this up is a bit of a hassle. Making this more convenient is the main selling point of many browser programming libraries. But for a small application like this, we can do it without such infrastructure.
Updates to the state are represented as objects, which we’ll call actions. Components may create such actions and dispatch them—give them to a central state management function. That function computes the next state, after which the interface components update themselves to this new state.
We’re taking the messy task of running a user interface and applying structure to it. Though the DOM-related pieces are still full of side effects, they are held up by a conceptually simple backbone: the state update cycle. The state determines what the DOM looks like, and the only way DOM events can change the state is by dispatching actions to the state.
There are many variants of this approach, each with its own benefits and problems, but their central idea is the same: state changes should go through a single well-defined channel, not happen all over the place.
Our components will be classes conforming to an interface. Their constructor is given a state—which may be the whole application state or some smaller value if it doesn’t need access to everything—and uses that to build up a dom property. This is the DOM element that represents the component. Most constructors will also take some other values that won’t change over time, such as the function they can use to dispatch an action.
Each component has a syncState method that is used to synchronize it to a new state value. The method takes one argument, the state, which is of the same type as the first argument to its constructor.
The state
The application state will be an object with picture, tool, and color properties. The picture is itself an object that stores the width, height, and pixel content of the picture. The pixels are stored in a single array, row by row, from top to bottom.
class Picture {
  constructor(width, height, pixels) {
    this.width = width;
    this.height = height;
    this.pixels = pixels;
  }
  static empty(width, height, color) {
    let pixels = new Array(width * height).fill(color);
    return new Picture(width, height, pixels);
  }
  pixel(x, y) {
    return this.pixels[x + y * this.width];
  }
  draw(pixels) {
    let copy = this.pixels.slice();
    for (let {x, y, color} of pixels) {
      copy[x + y * this.width] = color;
    }
    return new Picture(this.width, this.height, copy);
  }
}
We want to be able to treat a picture as an immutable value, for reasons we’ll get back to later in the chapter. But we also sometimes need to update a whole bunch of pixels at a time. To be able to do that, the class has a draw method that expects an array of updated pixels—objects with x, y, and color properties—and creates a new picture with those pixels overwritten. This method uses slice without arguments to copy the entire pixel array—the start of the slice defaults to 0, and the end defaults to the array’s length.
The empty method uses two pieces of array functionality that we haven’t seen before. The Array constructor can be called with a number to create an empty array of the given length. The fill method can then be used to fill this array with a given value. These are used to create an array in which all pixels have the same color.
Colors are stored as strings containing traditional CSS color codes made up of a hash sign (#) followed by six hexadecimal (base-16) digits—two for the red component, two for the green component, and two for the blue component. This is a somewhat cryptic and inconvenient way to write colors, but it is the format the HTML color input field uses, and it can be used in the fillStyle property of a canvas drawing context, so for the ways we’ll use colors in this program, it is practical enough.
Black, where all components are zero, is written "#000000", and bright pink looks like "#ff00ff", where the red and blue components have the maximum value of 255, written ff in hexadecimal digits (which use a to f to represent digits 10 to 15).
We’ll allow the interface to dispatch actions as objects whose properties overwrite the properties of the previous state. The color field, when the user changes it, could dispatch an object like {color: field., from which this update function can compute a new state.
function updateState(state, action) {
  return {...state, ...action};
}
This pattern, in which object spread is used to first add the properties of an existing object and then override some of those, is common in JavaScript code that uses immutable objects.
DOM building
One of the main things that interface components do is create DOM structure. We again don’t want to directly use the verbose DOM methods for that, so here’s a slightly expanded version of the elt function:
function elt(type, props, ...children) {
  let dom = document.createElement(type);
  if (props) Object.assign(dom, props);
  for (let child of children) {
    if (typeof child != "string") dom.appendChild(child);
    else dom.appendChild(document.createTextNode(child));
  }
  return dom;
}
The main difference between this version and the one we used in Chapter 16 is that it assigns properties to DOM nodes, not attributes. This means we can’t use it to set arbitrary attributes, but we can use it to set properties whose value isn’t a string, such as onclick, which can be set to a function to register a click event handler.
This allows this convenient style for registering event handlers:
<body>
  <script>
    document.body.appendChild(elt("button", {
      onclick: () => console.log("click")
    }, "The button"));
  </script>
</body>
The canvas
The first component we’ll define is the part of the interface that displays the picture as a grid of colored boxes. This component is responsible for two things: showing a picture and communicating pointer events on that picture to the rest of the application.
Therefore, we can define it as a component that only knows about the current picture, not the whole application state. Because it doesn’t know how the application as a whole works, it cannot directly dispatch actions. Rather, when responding to pointer events, it calls a callback function provided by the code that created it, which will handle the application-specific parts.
const scale = 10;

class PictureCanvas {
  constructor(picture, pointerDown) {
    this.dom = elt("canvas", {
      onmousedown: event => this.mouse(event, pointerDown),
      ontouchstart: event => this.touch(event, pointerDown)
    });
    this.syncState(picture);
  }
  syncState(picture) {
    if (this.picture == picture) return;
    this.picture = picture;
    drawPicture(this.picture, this.dom, scale);
  }
}
We draw each pixel as a 10-by-10 square, as determined by the scale constant. To avoid unnecessary work, the component keeps track of its current picture and does a redraw only when syncState is given a new picture.
The actual drawing function sets the size of the canvas based on the scale and picture size and fills it with a series of squares, one for each pixel.
function drawPicture(picture, canvas, scale) {
  canvas.width = picture.width * scale;
  canvas.height = picture.height * scale;
  let cx = canvas.getContext("2d");

  for (let y = 0; y < picture.height; y++) {
    for (let x = 0; x < picture.width; x++) {
      cx.fillStyle = picture.pixel(x, y);
      cx.fillRect(x * scale, y * scale, scale, scale);
    }
  }
}
When the left mouse button is pressed while the mouse is over the picture canvas, the component calls the pointerDown callback, giving it the position of the pixel that was clicked—in picture coordinates. This will be used to implement mouse interaction with the picture. The callback may return another callback function to be notified when the pointer is moved to a different pixel while the button is held down.
PictureCanvas.prototype.mouse = function(downEvent, onDown) {
  if (downEvent.button != 0) return;
  let pos = pointerPosition(downEvent, this.dom);
  let onMove = onDown(pos);
  if (!onMove) return;
  let move = moveEvent => {
    if (moveEvent.buttons == 0) {
      this.dom.removeEventListener("mousemove", move);
    } else {
      let newPos = pointerPosition(moveEvent, this.dom);
      if (newPos.x == pos.x && newPos.y == pos.y) return;
      pos = newPos;
      onMove(newPos);
    }
  };
  this.dom.addEventListener("mousemove", move);
};

function pointerPosition(pos, domNode) {
  let rect = domNode.getBoundingClientRect();
  return {x: Math.floor((pos.clientX - rect.left) / scale),
          y: Math.floor((pos.clientY - rect.top) / scale)};
}
Since we know the size of the pixels and we can use getBoundingClientRect to find the position of the canvas on the screen, it is possible to go from mouse event coordinates (clientX and clientY) to picture coordinates. These are always rounded down so that they refer to a specific pixel.
With touch events, we have to do something similar, but using different events and making sure we call preventDefault on the "touchstart" event to prevent panning.
PictureCanvas.prototype.touch = function(startEvent,
                                         onDown) {
  let pos = pointerPosition(startEvent.touches[0], this.dom);
  let onMove = onDown(pos);
  startEvent.preventDefault();
  if (!onMove) return;
  let move = moveEvent => {
    let newPos = pointerPosition(moveEvent.touches[0],
                                 this.dom);
    if (newPos.x == pos.x && newPos.y == pos.y) return;
    pos = newPos;
    onMove(newPos);
  };
  let end = () => {
    this.dom.removeEventListener("touchmove", move);
    this.dom.removeEventListener("touchend", end);
  };
  this.dom.addEventListener("touchmove", move);
  this.dom.addEventListener("touchend", end);
};
For touch events, clientX and clientY aren’t available directly on the event object, but we can use the coordinates of the first touch object in the touches property.
The application
To make it possible to build the application piece by piece, we’ll implement the main component as a shell around a picture canvas and a dynamic set of tools and controls that we pass to its constructor.
The controls are the interface elements that appear below the picture. They’ll be provided as an array of component constructors.
The tools do things like drawing pixels or filling in an area. The application shows the set of available tools as a <select> field. The currently selected tool determines what happens when the user interacts with the picture with a pointer device. The set of available tools is provided as an object that maps the names that appear in the drop-down field to functions that implement the tools. Such functions get a picture position, a current application state, and a dispatch function as arguments. They may return a move handler function that gets called with a new position and a current state when the pointer moves to a different pixel.
class PixelEditor {
  constructor(state, config) {
    let {tools, controls, dispatch} = config;
    this.state = state;

    this.canvas = new PictureCanvas(state.picture, pos => {
      let tool = tools[this.state.tool];
      let onMove = tool(pos, this.state, dispatch);
      if (onMove) return pos => onMove(pos, this.state);
    });
    this.controls = controls.map(
      Control => new Control(state, config));
    this.dom = elt("div", {}, this.canvas.dom, elt("br"),
                   ...this.controls.reduce(
                     (a, c) => a.concat(" ", c.dom), []));
  }
  syncState(state) {
    this.state = state;
    this.canvas.syncState(state.picture);
    for (let ctrl of this.controls) ctrl.syncState(state);
  }
}
The pointer handler given to PictureCanvas calls the currently selected tool with the appropriate arguments and, if that returns a move handler, adapts it to also receive the state.
All controls are constructed and stored in this.controls so that they can be updated when the application state changes. The call to reduce introduces spaces between the controls’ DOM elements. That way, they don’t look so pressed together.
The first control is the tool selection menu. It creates a <select> element with an option for each tool and sets up a "change" event handler that updates the application state when the user selects a different tool.
class ToolSelect {
  constructor(state, {tools, dispatch}) {
    this.select = elt("select", {
      onchange: () => dispatch({tool: this.select.value})
    }, ...Object.keys(tools).map(name => elt("option", {
      selected: name == state.tool
    }, name)));
    this.dom = elt("label", null, "🖌 Tool: ", this.select);
  }
  syncState(state) { this.select.value = state.tool; }
}
By wrapping the label text and the field in a <label> element, we tell the browser that the label belongs to that field so that you can, for example, click the label to focus the field.
We also need to be able to change the color, so let’s add a control for that. An HTML <input> element with a type attribute of color gives us a form field that is specialized for selecting colors. Such a field’s value is always a CSS color code in "#RRGGBB" format (red, green, and blue components, two digits per color). The browser will show a color picker interface when the user interacts with it.
This control creates such a field and wires it up to stay synchronized with the application state’s color property.
class ColorSelect {
  constructor(state, {dispatch}) {
    this.input = elt("input", {
      type: "color",
      value: state.color,
      onchange: () => dispatch({color: this.input.value})
    });
    this.dom = elt("label", null, "🎨 Color: ", this.input);
  }
  syncState(state) { this.input.value = state.color; }
}
Drawing tools
Before we can draw anything, we need to implement the tools that will control the functionality of mouse or touch events on the canvas.
The most basic tool is the draw tool, which changes any pixel you click or tap to the currently selected color. It dispatches an action that updates the picture to a version in which the pointed-at pixel is given the currently selected color.
function draw(pos, state, dispatch) {
  function drawPixel({x, y}, state) {
    let drawn = {x, y, color: state.color};
    dispatch({picture: state.picture.draw([drawn])});
  }
  drawPixel(pos, state);
  return drawPixel;
}
The function immediately calls the drawPixel function but then also returns it so that it’s called again for newly touched pixels when the user drags or swipes over the picture.
To draw larger shapes, it can be useful to quickly create rectangles. The rectangle tool draws a rectangle between the point where you start dragging and the point that you drag to.
function rectangle(start, state, dispatch) {
  function drawRectangle(pos) {
    let xStart = Math.min(start.x, pos.x);
    let yStart = Math.min(start.y, pos.y);
    let xEnd = Math.max(start.x, pos.x);
    let yEnd = Math.max(start.y, pos.y);
    let drawn = [];
    for (let y = yStart; y <= yEnd; y++) {
      for (let x = xStart; x <= xEnd; x++) {
        drawn.push({x, y, color: state.color});
      }
    }
    dispatch({picture: state.picture.draw(drawn)});
  }
  drawRectangle(start);
  return drawRectangle;
}
An important detail in this implementation is that when dragging, the rectangle is redrawn on the picture from the original state. That way, you can make the rectangle larger and smaller again while creating it, without the intermediate rectangles sticking around in the final picture. This is one of the reasons why immutable picture objects are useful—we’ll see another reason later.
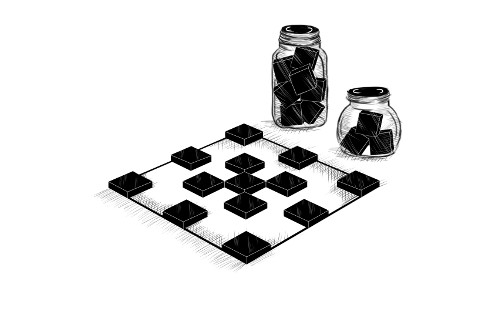
Implementing flood fill is somewhat more involved. This is a tool that fills the pixel under the pointer and all adjacent pixels that have the same color. “Adjacent” means directly horizontally or vertically adjacent, not diagonally. This picture illustrates the set of pixels colored when the flood fill tool is used at the marked pixel:

Interestingly, the way we’ll do this looks a bit like the pathfinding code from Chapter 7. Whereas that code searched through a graph to find a route, this code searches through a grid to find all “connected” pixels. The problem of keeping track of a branching set of possible routes is similar.
const around = [{dx: -1, dy: 0}, {dx: 1, dy: 0},
                {dx: 0, dy: -1}, {dx: 0, dy: 1}];

function fill({x, y}, state, dispatch) {
  let targetColor = state.picture.pixel(x, y);
  let drawn = [{x, y, color: state.color}];
  let visited = new Set();
  for (let done = 0; done < drawn.length; done++) {
    for (let {dx, dy} of around) {
      let x = drawn[done].x + dx, y = drawn[done].y + dy;
      if (x >= 0 && x < state.picture.width &&
          y >= 0 && y < state.picture.height &&
          !visited.has(x + "," + y) &&
          state.picture.pixel(x, y) == targetColor) {
        drawn.push({x, y, color: state.color});
        visited.add(x + "," + y);
      }
    }
  }
  dispatch({picture: state.picture.draw(drawn)});
}
The array of drawn pixels doubles as the function’s work list. For each pixel reached, we have to see whether any adjacent pixels have the same color and haven’t already been painted over. The loop counter lags behind the length of the drawn array as new pixels are added. Any pixels ahead of it still need to be explored. When it catches up with the length, no unexplored pixels remain, and the function is done.
The final tool is a color picker, which allows you to point at a color in the picture to use it as the current drawing color.
function pick(pos, state, dispatch) {
  dispatch({color: state.picture.pixel(pos.x, pos.y)});
}
We can now test our application!
<div></div>
<script>
  let state = {
    tool: "draw",
    color: "#000000",
    picture: Picture.empty(60, 30, "#f0f0f0")
  };
  let app = new PixelEditor(state, {
    tools: {draw, fill, rectangle, pick},
    controls: [ToolSelect, ColorSelect],
    dispatch(action) {
      state = updateState(state, action);
      app.syncState(state);
    }
  });
  document.querySelector("div").appendChild(app.dom);
</script>
Saving and loading
When we’ve drawn our masterpiece, we’ll want to save it for later. We should add a button for downloading the current picture as an image file. This control provides that button:
class SaveButton {
  constructor(state) {
    this.picture = state.picture;
    this.dom = elt("button", {
      onclick: () => this.save()
    }, "💾 Save");
  }
  save() {
    let canvas = elt("canvas");
    drawPicture(this.picture, canvas, 1);
    let link = elt("a", {
      href: canvas.toDataURL(),
      download: "pixelart.png"
    });
    document.body.appendChild(link);
    link.click();
    link.remove();
  }
  syncState(state) { this.picture = state.picture; }
}
The component keeps track of the current picture so that it can access it when saving. To create the image file, it uses a <canvas> element on which it draws the picture (at a scale of one pixel per pixel).
The toDataURL method on a canvas element creates a URL that uses the data: scheme. Unlike http: and https: URLs, data URLs contain the whole resource in the URL. They are usually very long, but they allow us to create working links to arbitrary pictures, right here in the browser.
To actually get the browser to download the picture, we then create a link element that points at this URL and has a download attribute. Such links, when clicked, make the browser show a file save dialog. We add that link to the document, simulate a click on it, and remove it again. You can do a lot with browser technology, but sometimes the way to do it is rather odd.
And it gets worse. We’ll also want to be able to load existing image files into our application. To do that, we again define a button component.
class LoadButton {
  constructor(_, {dispatch}) {
    this.dom = elt("button", {
      onclick: () => startLoad(dispatch)
    }, "📁 Load");
  }
  syncState() {}
}

function startLoad(dispatch) {
  let input = elt("input", {
    type: "file",
    onchange: () => finishLoad(input.files[0], dispatch)
  });
  document.body.appendChild(input);
  input.click();
  input.remove();
}
To get access to a file on the user’s computer, we need the user to select the file through a file input field. But we don’t want the load button to look like a file input field, so we create the file input when the button is clicked and then pretend that this file input itself was clicked.
When the user has selected a file, we can use FileReader to get access to its contents, again as a data URL. That URL can be used to create an <img> element, but because we can’t get direct access to the pixels in such an image, we can’t create a Picture object from that.
function finishLoad(file, dispatch) {
  if (file == null) return;
  let reader = new FileReader();
  reader.addEventListener("load", () => {
    let image = elt("img", {
      onload: () => dispatch({
        picture: pictureFromImage(image)
      }),
      src: reader.result
    });
  });
  reader.readAsDataURL(file);
}
To get access to the pixels, we must first draw the picture to a <canvas> element. The canvas context has a getImageData method that allows a script to read its pixels. So once the picture is on the canvas, we can access it and construct a Picture object.
function pictureFromImage(image) {
  let width = Math.min(100, image.width);
  let height = Math.min(100, image.height);
  let canvas = elt("canvas", {width, height});
  let cx = canvas.getContext("2d");
  cx.drawImage(image, 0, 0);
  let pixels = [];
  let {data} = cx.getImageData(0, 0, width, height);

  function hex(n) {
    return n.toString(16).padStart(2, "0");
  }
  for (let i = 0; i < data.length; i += 4) {
    let [r, g, b] = data.slice(i, i + 3);
    pixels.push("#" + hex(r) + hex(g) + hex(b));
  }
  return new Picture(width, height, pixels);
}
We’ll limit the size of images to 100 by 100 pixels, since anything bigger will look huge on our display and might slow down the interface.
The data property of the object returned by getImageData is an array of color components. For each pixel in the rectangle specified by the arguments, it contains four values that represent the red, green, blue, and alpha components of the pixel’s color, as numbers between 0 and 255. The alpha part represents opacity—when it is 0, the pixel is fully transparent, and when it is 255, it is fully opaque. For our purpose, we can ignore it.
The two hexadecimal digits per component, as used in our color notation, correspond precisely to the 0 to 255 range—two base-16 digits can express 162 = 256 different numbers. The toString method of numbers can be given a base as an argument, so n.toString(16) will produce a string representation in base 16. We have to make sure that each number takes up two digits, so the hex helper function calls padStart to add a leading 0 when necessary.
We can load and save now! That leaves just one more feature before we’re done.
Undo history
Because half the process of editing is making little mistakes and correcting them, an important feature in a drawing program is an undo history.
To be able to undo changes, we need to store previous versions of the picture. Since pictures are immutable values, that’s easy. But it does require an additional field in the application state.
We’ll add a done array to keep previous versions of the picture. Maintaining this property requires a more complicated state update function that adds pictures to the array.
We don’t want to store every change, though—just changes that are a certain amount of time apart. To be able to do that, we’ll need a second property, doneAt, to track the time at which we last stored a picture in the history.
function historyUpdateState(state, action) {
  if (action.undo == true) {
    if (state.done.length == 0) return state;
    return {
      ...state,
      picture: state.done[0],
      done: state.done.slice(1),
      doneAt: 0
    };
  } else if (action.picture &&
             state.doneAt < Date.now() - 1000) {
    return {
      ...state,
      ...action,
      done: [state.picture, ...state.done],
      doneAt: Date.now()
    };
  } else {
    return {...state, ...action};
  }
}
When the action is an undo action, the function takes the most recent picture from the history and makes that the current picture. It sets doneAt to zero so that the next change is guaranteed to store the picture back in the history, allowing you to revert to it another time if you want.
Otherwise, if the action contains a new picture and the last time we stored something is more than a second (1000 milliseconds) ago, the done and doneAt properties are updated to store the previous picture.
The undo button component doesn’t do much. It dispatches undo actions when clicked and disables itself when there is nothing to undo.
class UndoButton {
  constructor(state, {dispatch}) {
    this.dom = elt("button", {
      onclick: () => dispatch({undo: true}),
      disabled: state.done.length == 0
    }, "⮪ Undo");
  }
  syncState(state) {
    this.dom.disabled = state.done.length == 0;
  }
}
Let’s draw
To set up the application, we need to create a state, a set of tools, a set of controls, and a dispatch function. We can pass them to the PixelEditor constructor to create the main component. Since we’ll need to create several editors in the exercises, we first define some bindings.
const startState = {
  tool: "draw",
  color: "#000000",
  picture: Picture.empty(60, 30, "#f0f0f0"),
  done: [],
  doneAt: 0
};

const baseTools = {draw, fill, rectangle, pick};

const baseControls = [
  ToolSelect, ColorSelect, SaveButton, LoadButton, UndoButton
];

function startPixelEditor({state = startState,
                           tools = baseTools,
                           controls = baseControls}) {
  let app = new PixelEditor(state, {
    tools,
    controls,
    dispatch(action) {
      state = historyUpdateState(state, action);
      app.syncState(state);
    }
  });
  return app.dom;
}
When destructuring an object or array, you can use = after a binding name to give the binding a default value, which is used when the property is missing or holds undefined. The startPixelEditor function makes use of this to accept an object with a number of optional properties as an argument. If you don’t provide a tools property, for example, tools will be bound to baseTools.
This is how we get an actual editor on the screen:
<div></div>
<script>
  document.querySelector("div")
    .appendChild(startPixelEditor({}));
</script>
Why is this so hard?
Browser technology is amazing. It provides a powerful set of interface building blocks, ways to style and manipulate them, and tools to inspect and debug your applications. The software you write for the browser can be run on almost every computer and phone on the planet.
At the same time, browser technology is ridiculous. You have to learn a large number of silly tricks and obscure facts to master it, and the default programming model it provides is so problematic that most programmers prefer to cover it in several layers of abstraction rather than deal with it directly.
While the situation is definitely improving, it mostly does so in the form of more elements being added to address shortcomings—creating even more complexity. A feature used by a million websites can’t really be replaced. Even if it could, it would be hard to decide what it should be replaced with.
Technology never exists in a vacuum—we’re constrained by our tools and the social, economic, and historical factors that produced them. This can be annoying, but it is generally more productive to try to build a good understanding of how the existing technical reality works—and why it is the way it is—than to rage against it or hold out for another reality.
New abstractions can be helpful. The component model and data flow convention I used in this chapter is a crude form of that. As mentioned, there are libraries that try to make user interface programming more pleasant. At the time of writing, React and Svelte are popular choices, but there’s a whole cottage industry of such frameworks. If you’re interested in programming web applications, I recommend investigating a few of them to understand how they work and what benefits they provide.
Exercises
There is still room for improvement in our program. Let’s add a few more features as exercises.
Keyboard bindings
Add keyboard shortcuts to the application. The first letter of a tool’s name selects the tool, and ctrl-Z or command-Z activates undo.
Do this by modifying the PixelEditor component. Add a tabIndex property of 0 to the wrapping <div> element so that it can receive keyboard focus. Note that the property corresponding to the tabindex attribute is called tabIndex, with a capital I, and our elt function expects property names. Register the key event handlers directly on that element. This means you have to click, touch, or tab to the application before you can interact with it with the keyboard.
Remember that keyboard events have ctrlKey and metaKey (for command on Mac) properties that you can use to see whether those keys are held down.
<div></div>
<script>
  // The original PixelEditor class. Extend the constructor.
  class PixelEditor {
    constructor(state, config) {
      let {tools, controls, dispatch} = config;
      this.state = state;

      this.canvas = new PictureCanvas(state.picture, pos => {
        let tool = tools[this.state.tool];
        let onMove = tool(pos, this.state, dispatch);
        if (onMove) {
          return pos => onMove(pos, this.state, dispatch);
        }
      });
      this.controls = controls.map(
        Control => new Control(state, config));
      this.dom = elt("div", {}, this.canvas.dom, elt("br"),
                     ...this.controls.reduce(
                       (a, c) => a.concat(" ", c.dom), []));
    }
    syncState(state) {
      this.state = state;
      this.canvas.syncState(state.picture);
      for (let ctrl of this.controls) ctrl.syncState(state);
    }
  }

  document.querySelector("div")
    .appendChild(startPixelEditor({}));
</script>
Display hints...
The key property of events for letter keys will be the lowercase letter itself, if shift isn’t being held. We’re not interested in key events with shift here.
A "keydown" handler can inspect its event object to see whether it matches any of the shortcuts. You can automatically get the list of first letters from the tools object so that you don’t have to write them out.
When the key event matches a shortcut, call preventDefault on it and dispatch the appropriate action.
Efficient drawing
During drawing, the majority of work that our application does happens in drawPicture. Creating a new state and updating the rest of the DOM isn’t very expensive, but repainting all the pixels on the canvas is quite a bit of work.
Find a way to make the syncState method of PictureCanvas faster by redrawing only the pixels that actually changed.
Remember that drawPicture is also used by the save button, so if you change it, either make sure the changes don’t break the old use or create a new version with a different name.
Also note that changing the size of a <canvas> element, by setting its width or height properties, clears it, making it entirely transparent again.
<div></div>
<script>
  // Change this method
  PictureCanvas.prototype.syncState = function(picture) {
    if (this.picture == picture) return;
    this.picture = picture;
    drawPicture(this.picture, this.dom, scale);
  };

  // You may want to use or change this as well
  function drawPicture(picture, canvas, scale) {
    canvas.width = picture.width * scale;
    canvas.height = picture.height * scale;
    let cx = canvas.getContext("2d");

    for (let y = 0; y < picture.height; y++) {
      for (let x = 0; x < picture.width; x++) {
        cx.fillStyle = picture.pixel(x, y);
        cx.fillRect(x * scale, y * scale, scale, scale);
      }
    }
  }

  document.querySelector("div")
    .appendChild(startPixelEditor({}));
</script>
Display hints...
This exercise is a good example of how immutable data structures can make code faster. Because we have both the old and the new picture, we can compare them and redraw only the pixels that changed color, saving more than 99 percent of the drawing work in most cases.
You can either write a new function updatePicture or have drawPicture take an extra argument, which may be undefined or the previous picture. For each pixel, the function checks whether a previous picture was passed with the same color at this position and skips the pixel when that is the case.
Because the canvas gets cleared when we change its size, you should also avoid touching its width and height properties when the old picture and the new picture have the same size. If they are different, which will happen when a new picture has been loaded, you can set the binding holding the old picture to null after changing the canvas size because you shouldn’t skip any pixels after you’ve changed the canvas size.
Circles
Define a tool called circle that draws a filled circle when you drag. The center of the circle lies at the point where the drag or touch gesture starts, and its radius is determined by the distance dragged.
<div></div>
<script>
  function circle(pos, state, dispatch) {
    // Your code here
  }

  let dom = startPixelEditor({
    tools: {...baseTools, circle}
  });
  document.querySelector("div").appendChild(dom);
</script>
Display hints...
You can take some inspiration from the rectangle tool. As with that tool, you’ll want to keep drawing on the starting picture, rather than the current picture, when the pointer moves.
To figure out which pixels to color, you can use the Pythagorean theorem. First figure out the distance between the current pointer position and the start position by taking the square root (Math.sqrt) of the sum of the square (x ** 2) of the difference in x-coordinates and the square of the difference in y-coordinates. Then loop over a square of pixels around the start position, whose sides are at least twice the radius, and color those that are within the circle’s radius, again using the Pythagorean formula to figure out their distance from the center.
Make sure you don’t try to color pixels that are outside of the picture’s boundaries.
Proper lines
This is a more advanced exercise than the preceding three, and it will require you to design a solution to a nontrivial problem. Make sure you have plenty of time and patience before starting to work on this exercise, and don’t get discouraged by initial failures.
On most browsers, when you select the draw tool and quickly drag across the picture, you don’t get a closed line. Rather, you get dots with gaps between them because the "mousemove" or "touchmove" events did not fire quickly enough to hit every pixel.
Improve the draw tool to make it draw a full line. This means you have to make the motion handler function remember the previous position and connect that to the current one.
To do this, since the pixels can be an arbitrary distance apart, you’ll have to write a general line drawing function.
A line between two pixels is a connected chain of pixels, as straight as possible, going from the start to the end. Diagonally adjacent pixels count as connected. A slanted line should look like the picture on the left, not the picture on the right.

Finally, if we have code that draws a line between two arbitrary points, we might as well use it to also define a line tool, which draws a straight line between the start and end of a drag.
<div></div>
<script>
  // The old draw tool. Rewrite this.
  function draw(pos, state, dispatch) {
    function drawPixel({x, y}, state) {
      let drawn = {x, y, color: state.color};
      dispatch({picture: state.picture.draw([drawn])});
    }
    drawPixel(pos, state);
    return drawPixel;
  }

  function line(pos, state, dispatch) {
    // Your code here
  }

  let dom = startPixelEditor({
    tools: {draw, line, fill, rectangle, pick}
  });
  document.querySelector("div").appendChild(dom);
</script>
Display hints...
The thing about the problem of drawing a pixelated line is that it is really four similar but slightly different problems. Drawing a horizontal line from the left to the right is easy—you loop over the x-coordinates and color a pixel at every step. If the line has a slight slope (less than 45 degrees or ¼π radians), you can interpolate the y-coordinate along the slope. You still need one pixel per x position, with the y position of those pixels determined by the slope.
But as soon as your slope goes across 45 degrees, you need to switch the way you treat the coordinates. You now need one pixel per y position, since the line goes up more than it goes left. And then, when you cross 135 degrees, you have to go back to looping over the x-coordinates, but from right to left.
You don’t actually have to write four loops. Since drawing a line from A to B is the same as drawing a line from B to A, you can swap the start and end positions for lines going from right to left and treat them as going left to right.
So you need two different loops. The first thing your line drawing function should do is check whether the difference between the x-coordinates is larger than the difference between the y-coordinates. If it is, this is a horizontalish line, and if not, a verticalish one.
Make sure you compare the absolute values of the x and y difference, which you can get with Math.abs.
Once you know along which axis you will be looping, you can check whether the start point has a higher coordinate along that axis than the endpoint and swap them if necessary. A succinct way to swap the values of two bindings in JavaScript uses destructuring assignment like this:
[start, end] = [end, start];
Then you can compute the slope of the line, which determines the amount the coordinate on the other axis changes for each step you take along your main axis. With that, you can run a loop along the main axis while also tracking the corresponding position on the other axis, and you can draw pixels on every iteration. Make sure you round the nonmain axis coordinates, since they are likely to be fractional and the draw method doesn’t respond well to fractional coordinates.